

How to Set Up AT&T Email on iPhone: A Step-by-Step Guide
Are you an AT&T user who wants to set up their email on an iPhone? Look no further! In this comprehensive guide, we will walk you through the process of setting up your AT&T email on your iPhone. Whether you’re a beginner or a seasoned iPhone user, we’ve got you covered. Let’s get started!
1. Introduction
Setting up your AT&T email on your iPhone allows you to access your emails conveniently on the go. With a few simple steps, you’ll be able to send and receive emails using the built-in Mail app on your iPhone.
2. Gathering Information
Before we begin the setup process, make sure you have the following information readily available:
- Your AT&T email address
- Your AT&T email password
- Incoming mail server (IMAP/POP)
- Outgoing mail server (SMTP)
3. Adding an Email Account
To add your AT&T email account to your iPhone, follow these steps:
- Open the “Settings” app on your iPhone.
- Scroll down and tap on “Mail.”
- Tap on “Accounts” and then select “Add Account.”
4. Choosing the Account Type
When prompted to choose an account type, select “Other” as we’ll be manually configuring the AT&T email settings.
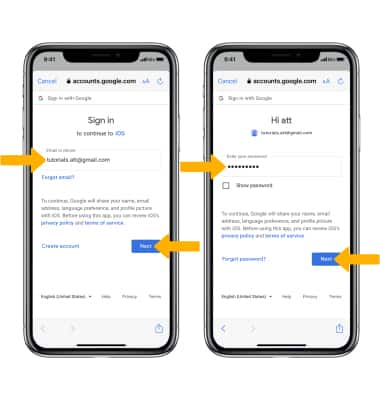
5. Entering Account Details
Enter your name, AT&T email address, password, and a description for your email account. Once done, tap “Next.”
6. Configuring Incoming Mail Server
In this step, we’ll configure the incoming mail server settings. Follow these instructions:
- Choose either IMAP or POP based on your preference. IMAP allows you to access your emails on multiple devices, while POP downloads them to your iPhone.
- Enter the incoming mail server details provided by AT&T.
- Enter your email address as the username.
- Enter your email password.
- Tap “Next” to proceed.
7. Configuring Outgoing Mail Server
Now, let’s configure the outgoing mail server settings. Here’s what you need to do:
- Enter the outgoing mail server details provided by AT&T.
- Enter your email address as the username.
- Enter your email password.
- Tap “Next” to continue.
8. Completing the Setup
Your iPhone will now verify the settings and establish a connection with the AT&T email servers. Once the verification is successful, you can choose which data to sync with your iPhone, such as Mail, Contacts, and Calendars. Enable the desired options and tap “Save” to complete the setup.
9. Troubleshooting Tips
If you encounter any issues during the setup process, try the following troubleshooting tips:
- Double-check your AT&T email address and password.
- Ensure that you have a stable internet connection.
- Verify the incoming and outgoing mail server settings.
- Restart your iPhone and try the setup process again.
- Contact AT&T customer support for further assistance.
10. Conclusion
Congratulations! You have successfully set up your AT&T email on your iPhone. Now you can stay connected and manage your emails conveniently from your iPhone’s Mail app. Enjoy the seamless email experience!
11. FAQs
Q1. Can I set up multiple AT&T email accounts on my iPhone?
Yes, you can set up multiple AT&T email accounts on your iPhone by following the same process outlined in this guide.
Q2. What should I do if I forgot my AT&T email password?
If you forgot your AT&T email password, you can reset it by visiting the AT&T website or contacting their customer support.
Q3. Can I use the AT&T Yahoo! Mail app instead of the built-in Mail app?
Yes, you can use the AT&T Yahoo! Mail app if you prefer a dedicated app for your AT&T email. However, the setup process may differ from the one described in this guide.
Q4. Will setting up AT&T email on my iPhone delete my existing emails?
No, setting up AT&T email on your iPhone will not delete your existing emails. The emails will be synced to your iPhone, allowing you to access them conveniently.
Q5. Can I customize the email settings after the initial setup?
Yes, you can customize the email settings after the initial setup. Simply go to “Settings” > “Mail” > “Accounts” > “AT&T” and make the desired changes.